Rewrite using Framework
-
Comments:
- here.
I think I might rewrite all of this site’s scripting using a framework. Probably Yahoo’s stuff, that looks very cool: YUI.
I think I might rewrite all of this site’s scripting using a framework. Probably Yahoo’s stuff, that looks very cool: YUI.
Apparently, the following command changes the scroll speed under MacOS X when using a scroll wheel mouse: write -globalDomain com.apple.scrollwheel.scaling _x.x_ Where x.x is replaced by a float, I use 2.5 I’m not sure how much of a difference it makes, but I’ll keep playing with it. Maybe it only changes it after a login.
I’ve just purchased, and started using a Logitech USB Optical mouse. It was pretty cheap, only AU$20, and I’ve wanted a scroll mouse for the iMac forever… So, I installed it, and downloaded the Logitech driver, to see if I could configure it to make it a bit better. And it looks like I can - there is an option to accelerate the scroll, so that scrolling faster scrolls more than the same distance slower. Then I looked in the readme:
Q: My LCC settings are gone after switching user with “Fast User Switching”, what happened?
A: LCC does not support “Fast User Switching”. In order to enjoy the different LCC configurations for multiple users, one has to log out and log in the system instead of using “Fast User Switching”. To log out and log in the system:
- Select Apple Menu on the upper left corner.
- Select “Log Out”.
- Click “Log Out” button when prompted.
- Select your log-in name or type in the log-in name. Then, enter your password.
- Click “Log In”.
What is this crap? Are you that lazy that you didn’t bother building some sort of support for FUS into the system? Don’t you think that anyone actually uses FUS? Uninstall. Very nearly take it back to the store to return it (doesn’t do what it says, isn’t fully supported under OS X), before deciding that that’s not worth the effort, and I was already pretty happy with how it works without the extra features! Still, angry with Logitech.
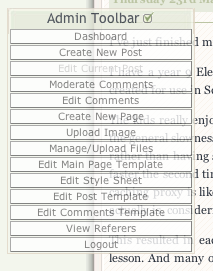
I’ve gotten frustrated with the fact my Admin Toolbar, which most of you won’t ever see, obscures some of the page at times: 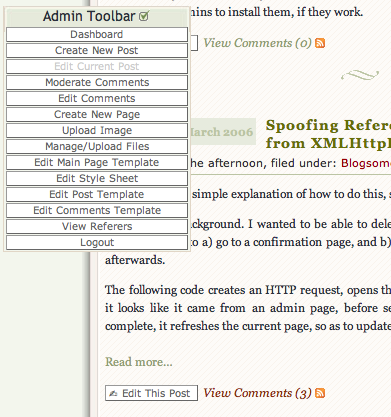 I’m really happy with how much time this saves me, however, so I don’t want to kill it. If only I could make it only appear when I’m actually hovering over it… And then I chanced upon the opacity: selector:
    #adToolbar{
        opacity:0.1;
        -moz-opacity:0.1;
        filter:alpha(opacity=10);
    }
    #adToolbar:hover{
        opacity:0.8;
        -moz-opacity:0.8;
        filter:alpha(opacity=80);
    }
(The second entry is for older versions of Firefox, the third for IE). Now, it looks more like: ![]()
 The only thing I’d like to do is make it so it fades in and out, which I might be able to do with the original JavaScript, or perhaps so that only the actual item that is being hovered over is more opaque. However, I’m struggling with the CSS to to this, so I’ll leave it out. I do like the idea of a fade in-out, however.
I’ve just finished my first trial of Scholaris with real students. I have a year 9 Electronics class, who attempted to complete a single activity on Diodes I had created for use in Scholaris. The kids really enjoyed it, but there were a few technical issues we came across. The first was the general slowness: I think this was because everything needed to be downloaded for each kid, rather than having some caching in place. Once each kid got onto the right stuff, it seemed to be faster the second time around. This would result in a fairly serious amount of data transfer, as a caching proxy is likely to determine that https: data is different for each user - and it probably actually is, considering that it is encrypted! This resulted in each student using up about 6Mb of their download allowance for one double lesson. And many of them ran out of internet data during that lesson, so only two were able to submit the work for marking. And that’s when the real problem started. Because I hadn’t assigned a FrameworkID, since previously there had been no inclusion of Design & Technology SACSA Framework data, the work that was submitted didn’t come through properly, and I wasn’t able to assess and then return the data to even these two students. I did spend the last 15 minutes having a group debrief, which was really valuable. Basically, the class came up with the following
Problems encountered:
- Too slow in loading up.
- Some issues with not loading for some students
- Lots of Internet usage – which students had to pay for.
- Work lost when ran out of internet.
- Want more fonts to choose from.
- Spell check
- Feedback as to when page is finished loading
Advantages of this system:
- Don’t lose your homework
- Don’t have to carry books everywhere
- Typing easier than writing (and neater)
- Don’t forget to bring homework to school.
- Easier for teachers to check/mark
- Helps with knowing when work is due.
Disadvantages of the system:
- Some people might not have internet access at home
- Disadvantages people without broadband
- Sometimes internet breaks
- Power loss is damaging
- Internet costs money
Ideas for improvement:
- Reminders of when work is due
- Automatic saving of work while working
I’ll repeat what I think I said last time I’d spent any time doing Scholaris work: they should be using AJAX, like Gmail does, rather than relying on page refreshes when sending data to the server. Gmail does this, and then it allows for autosaves, which can be life-savers. The same with the content creation process. It’s too cumbersome, with different dialog boxes and windows opening up, and then waiting for these to load. I’d almost rather the flexibility of coding in raw HTML, rather than their user-friendly format. At least some sort of an offline content creator. Export from Word? Actually, I’ll take that last one back. I just tried Word’s _Web Page Preview _option, and the code it generated was cluttered. I didn’t have any changes of fonts, or any styling other than just plain bulleted lists, and yet it managed to create style and class tags on each element. At least this is better than the font tags I remember seeing on other web page export/previews.
There isn’t a way to tell Blogsome you are writing in a different language, but with things like dates, that are generated using Smarty tags, there is a way to replace the English words with those of your chosen language. Where you’d normally use a tag like: {the_time d='l, j F Y'}, which would generate something like: Thursday, 23rd March 2006, you can set up your template with:
{capture name=the_date}{the_time d='l, j F Y'}{/capture}
Then, assign this captured text to a new variable, after translating each word you know might appear in the text using |replace:"old":"new", which you can repeat for each word. For example, to replace all of the day names with their Spanish equivalent, and assign the result to $la_fecha, I used:
{assign var=la_fecha value=$smarty.capture.the_date|replace:"Monday":"Lunes"|replace:"Tuesday":"Martes"|replace:"Wednesday":"Miércoles"|replace:"Thursday":"Jueves"|replace:"Friday":"Viernes"|replace:"Saturday":"Sábado"|replace:"Sunday":"Domingo"}
Then, wherever you want to use {the_date} in the Spanish format: {$la_fecha}. Obviously, you’ll need to repeat this for month names as well, which I will leave as an exercise to the reader.
Really, I don’t like the term AJAX. However, technically, I think that’s what my DeleteComment function does. It sends a request to the server, and updates the current DOM to reflect this. There’s no reason why normal Comments can’t be added or edited in the same way. Instead of the Edit Comment/Post opening up a new page, I might just make them turn the area into a textarea, and allow editing. Then, when clicking out (or perhaps, Save), the data is uploaded back to the server, and the page updated. This would make it very cool to edit posts in-place. For this, I might be better off investigating other options rather than re-building my own. Although that is kind of fun.
I’ve implemented the ability to delete a Comment while viewing it on a normal (user) post page. It will only appear if you are an admin. There are some issues: the first is that it doesn’t work under Internet Explorer. I didn’t realise until I read Using the XML HTTP Request object that IE uses a different way of initialising the XMLHttpRequest() object. I’ll build that in later. The second is that any user can (try to) delete a Comment when logged in - currently this script doesn’t check to see what is returned, and removes the Comment from the Post page regardless. What I need to do is examine the resulting HTML code, and find out if the request to delete the comment was successful. I’ll need to do some experiments to check this, but an xmlhttp.status might do the trick. To use it, just include <script type="text/javascript" src="http://schinckel.net/images/toolbox.js"> </script> in your <head>, and have a button/link with class="delete", inside your Comment <li> definition. Else, you can download the script, and examine how it works: http://schinckel.net/images/toolbox.js. The actual function that deletes the comment is:
    function DeleteComment(e){
        li = parentWithTagName(eventTarget(e),'LI');
        id = li.id.split('-')[1];
        if (!getById(li.id)) return true; //Fallback to Link!
        if (!confirm("Delete Comment #"+id+"?\nCannot be undone.")) return false;
        var admin = "http://" + document.domain + "/wp-admin/";
        var delreq = new XMLHttpRequest();
        delreq.open("GET",admin+"post.php?action=deletecomment&comment="+id);
        delreq.setRequestHeader("Referer",admin);
        delreq.send("");
        li.parentNode.removeChild(li);
        return false; //Stop Link being followed
    }
With the function:
    function parentWithTagName(node, tagName){
        if (node==document) return false;
        if (node.tagName==tagName) return node;
        return parentWithTagName(node.parentNode, tagName)
    }
existing elsewhere, and being used in this case. I like the neatness of this recursive function, which I originally wrote for finding a parent <form> element. I’ve also got a function getById(), which is a cross-browser wrapper for document.getElementById(), and eventTarget() which is the same for finding the target of an event. To add the function to the button, I use a script that just finds all elements with class="delete", and add onclick=DeleteComment. That’s all that needs to be done!
I just love this image: I can’t recall where it came from, but it makes me chuckle, each time I look at it. 
I’ve come across a couple of Smary Modifiers I want to have installed on Blogsome:
More available on: Smarty Plugins Wiki If there’s any more there anyone is interested in, leave a message and I’ll test them out. And then ask the admins to install them, if they work.