A Parking Assist for the Garage
- Comments:
- here.
My garage is packed, almost to the brim. I have shelving/tool racks along one side, and more things stacked at the back than I’d like. My car fits in, but only just.
I need to reverse in, as the middle of the double garage needs to be on the drivers’ side of my car (and that’s also the side with the charging port, and the charger is between the two cars). There’s enough space for me to back in safely, but if I go too far back, then it’s hard for me to access behind the car. Obviously, if I don’t go in far enough, then I won’t be able to shut the door.
So, over the weekend, I finally got around to making my Parking Assist module.
There is a beam that crosses the opening of the garage, set far enough away from the door so that the roller door will be able to close once that beam is “clear”.
The display is a WS2812 LED ring. When the beam is broken for more than four seconds, the LEDs run an animating red chaser. That gives someone walking through the beam time to clear it without triggering the display. When the beam clears, the whole ring flashes green and then stays green for a minute. If the beam is broken again during that minute, red starts immediately.
I’ve built lots of ESPHome devices in the past, but this one was a bit different: instead of me manually writing it, I used Kagi Assistant to talk through the requirements (and help plan the hardware, as there is a mismatch between the sensor and the board/lights voltages).
Using agentic assistants to work out how to couple all of the bits together was really useful. I didn’t have a level shifter to get the sensor’s 12 V output safely to the ESP32’s 3v3 GPIO, but I did have a MOSFET. I used it as a switch: the sensor output drives the gate through a 10 kΩ resistor, while the source is connected to ground and the drain to GPIO3. With INPUT_PULLUP enabled, the MOSFET pulls GPIO3 low when it switches on. The resistor is in series with the gate; the MOSFET keeps the sensor’s 12 V signal off the ESP32 pin.
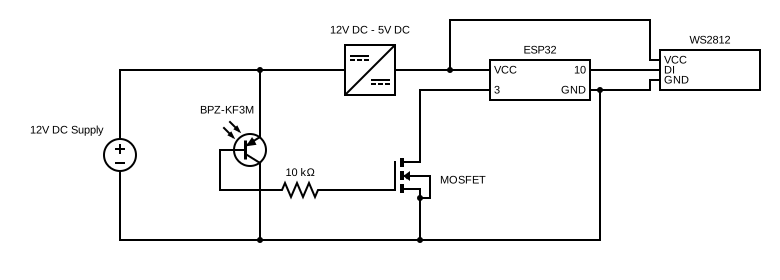
The ESPHome configuration is split into a small device file and a package for the parking behavior. The device file supplies the pin and timing values; the package defines the ring, beam sensor, and scripts. Here are the parts that make the idle delay behave differently from a re-break during an active parking cycle:
substitutions:
  ring_pin: GPIO10
  beam_pin: GPIO3
  clear_timeout: 60s
  break_delay: 4s

globals:
  - id: g_active
    type: bool
    restore_value: no
    initial_value: 'false'
  - id: g_doorway_blocked
    type: bool
    restore_value: no
    initial_value: 'false'

script:
  - id: beam_break_handler
    mode: restart
    then:
      - if:
          condition:
            lambda: 'return !id(g_active);'
          then:
            - delay: ${break_delay}
      - if:
          condition:
            binary_sensor.is_on: beam_raw
          then:
            - globals.set:
                id: g_active
                value: 'true'
            - globals.set:
                id: g_doorway_blocked
                value: 'true'
            - light.turn_on:
                id: ring
                brightness: 0.6
                effect: Red Chaser

binary_sensor:
  - platform: gpio
    id: beam_raw
    internal: true
    pin:
      number: ${beam_pin}
      mode: INPUT_PULLUP
    filters:
      - delayed_off: 100ms
    on_press:
      - script.stop: green_flash_then_on
      - script.execute: beam_break_handler
    on_release:
      - if:
          condition:
            lambda: 'return id(g_active);'
          then:
            - script.stop: beam_break_handler
            - script.execute: green_flash_then_on
The g_active check decides whether to wait. After an idle wait, the second check confirms the beam is still blocked before setting the blocked state or starting the red chaser. If it cleared during those four seconds, nothing is shown. During an active cycle, that wait is skipped, so a re-break still turns the ring red immediately. The complete package also handles the green flashes and timeout. I’ve also got an additional binary sensor exposed to Home Assistant, but that’s for diagnostic purposes only.