Hey Siri, Grind me a Double

We have a spare coffee grinder at work: it’s the same model I have at home, a Sunbeam Cafe Series EM0480. They are a pretty good coffee grinder: you can get them for around $200 or less, and with the conical burrs, they grind a nice consistency of coffee.

The one at work is somewhat surplus: it was the one we were using at the office, but it needs a new spacer because it will not grind fine enough to make a decent cup of coffee. I’ve been meaning to get one from eBay (I’ve had to do that to two other grinders).

So, I bought it home to attempt to hack in a timer circuit, so I could trigger it to grind for 11 or 16 seconds: the amount of time I normally count in my head when grinding a single or a double. It would be even better to have it weight based, and I even have some load sensor ICs coming, but I’m still not exactly how I’ll mount the actual load cell(s).

In the meantime, I bought an Arlec Grid Connect socket from Bunnings today. It’s just a pass-through, but can switch on/off automatically. And, importantly, like the plug I re-flashed the other week, it runs Tuya, so can be flashed without having to pull it to bits.

There is a bit of trial-and-error when doing that though: not with the actual flashing, but with determining which GPIO pins connect to which switch(es), or lights/relays.

I used a temporary firmware to help make that simpler:

substitutions:
  device_name: test_rig

wifi:
  ssid: !secret ssid
  password: !secret password

  ap:
    ssid: ${device_name}_fallback
    password: !secret password

captive_portal:

esphome:
  name: $device_name
  platform: ESP8266
  board: esp01_1m

binary_sensor:
  - platform: status
    name: "Status"

  - platform: gpio
    pin:
      number: GPIO0
      inverted: true
      mode: INPUT_PULLUP
    name: GPIO0

  - platform: gpio
    pin:
      number: GPIO1
      inverted: true
      mode: INPUT_PULLUP
    name: GPIO1

  - platform: gpio
    pin:
      number: GPIO2
      inverted: true
      mode: INPUT_PULLUP
    name: GPIO2

  - platform: gpio
    pin:
      number: GPIO3
      inverted: true
      mode: INPUT_PULLUP
    name: GPIO3

  - platform: gpio
    pin:
      number: GPIO4
      inverted: true
      mode: INPUT_PULLUP
    name: GPIO4

  - platform: gpio
    pin:
      number: GPIO5
      inverted: true
      mode: INPUT_PULLUP
    name: GPIO5

  - platform: gpio
    pin:
      number: GPIO12
      inverted: true
      mode: INPUT_PULLUP
    name: GPIO12

  - platform: gpio
    pin:
      number: GPIO13
      inverted: true
      mode: INPUT_PULLUP
    name: GPIO13

  - platform: gpio
    pin:
      number: GPIO14
      inverted: true
      mode: INPUT_PULLUP
    name: GPIO14

  - platform: gpio
    pin:
      number: GPIO15
      inverted: true
      mode: INPUT_PULLUP
    name: GPIO15

  - platform: gpio
    pin:
      number: GPIO16
      inverted: true
      mode: INPUT_PULLUP
    name: GPIO16

sensor:
  - platform: wifi_signal
    name: "WiFi signal sensor"
    update_interval: 60s

ota:

logger:

mqtt:
  broker: "mqtt.lan"
  discovery: false
  topic_prefix: esphome/${device_name}

You can flash the firmware.bin this config file generates, and then press each button, taking note of which one is connected to which GPIO pin.

Then, phase 2 is to see which GPIO pins are connected to the LED(s) and/or relays. I’ve generally still been doing that one by one, because there’s no real other convenient way to do it. You could have something that turns each one on and then off one after another, but that’s a bit tricky in esphome.

Anyway, in the case of this socket, the red LED is connected to GPIO13, the blue LED to GPIO4, and the relay to GPIO14.

My base esphome config file for this device looks like:

esphome:
  name: $device_name
  platform: ESP8266
  board: esp01_1m

binary_sensor:
  - platform: status
    name: "Status"

  - platform: gpio
    pin:
      number: GPIO14
      inverted: true
      mode: INPUT_PULLUP
    name: GPIO14
    on_press:
      - switch.toggle: relay

switch:
  - platform: gpio
    id: relay
    pin: GPIO12
    on_turn_on:
      - light.turn_on: red_led
      - light.turn_off: blue_led
      - mqtt.publish:
          topic: HomeKit/${device_name}/Switch/On
          retain: ON
          payload: 1
    on_turn_off:
      - light.turn_off: red_led
      - light.turn_on: blue_led
      - mqtt.publish:
         topic: HomeKit/${device_name}/Switch/On
         retain: ON
         payload: 0

light:
  - platform: binary
    output: led1
    id: red_led
    restore_mode: ALWAYS_OFF
  - platform: binary
    output: led2
    id: blue_led
    restore_mode: ALWAYS_ON

output:
  - platform: gpio
    pin:
      number: GPIO4
    id: led2
    inverted: True
  - platform: gpio
    pin:
      number: GPIO13
    id: led1
    inverted: True

sensor:
  - platform: wifi_signal
    name: "WiFi signal sensor"
    update_interval: 5min

ota:

logger:

mqtt:
  broker: "mqtt.lan"
  discovery: false
  topic_prefix: esphome/${device_name}
  on_message:
    - topic: HomeKit/${device_name}/Switch/On
      payload: "1"
      then:
        - switch.turn_on:
            id: relay
    - topic: HomeKit/${device_name}/Switch/On
      payload: "0"
      then:
        - switch.turn_off:
            id: relay
  birth_message:
    topic: HomeKit/${device_name}/Switch/On
    payload: "0"
  # will_message:
  #   topic: HomeKit/${device_name}/Switch/On
  #   payload: "N/A"

This includes the stuff to hook it up correctly to MQTT2HomeKit, which I’m now going to extend to it will hopefully correctly flag an accessory as “Not Available”.


But, that is only half of the puzzle. We still need some way to have the switch turn on, and then after a short period of time, turn off. It’s not possible to do this in HomeKit: you can have some other trigger turn on a Switch, and then turn it off after an integral number of minutes, but you can’t trigger a device to turn itself off after it turns on, or do so after 16 seconds.

Enter Node-RED, and Siri Shortcuts.

Because I’m a little paranoid about this accidentally triggering, I wanted to ensure that it turns off after the maximum grind time, for me about 16 seconds.

I also wanted to be able to trigger either a short or a long grind time. I’ve taken the approach of using two different HTTP endpoints for these two, although it would be possible to pass the required on time in a single endpoint.

Flow

Each HTTP endpoint sends two messages: one to turn on the grinder, and the other to delay for the required period of time, and then turn off the grinder. Each of these messages passes through a node that sets the required payload, and then goes to the same MQTT output node. The “Turn On” message also goes to an HTTP Response output node. It took me a while to realise that this is required, otherwise the Siri Shortcut will wait until the request times out.

The bottom MQTT input node listens for the grinder to be switched on (which could happen by a manual press of the button, or otherwise turning it on in HomeKit), and then, after 16 seconds, turns it off. I’ve reused the same message flow, so that this timer will always be the same as the “Grind a Double” message. In practice, we could just have the “Grind a Double” turn it on, and then this sub-flow turn it off, but explicit is better than implicit.

So that just leaves the Siri Shortcut. That too is fairly straightforward: it just fires off an HTTP POST request to the correct endpoint:
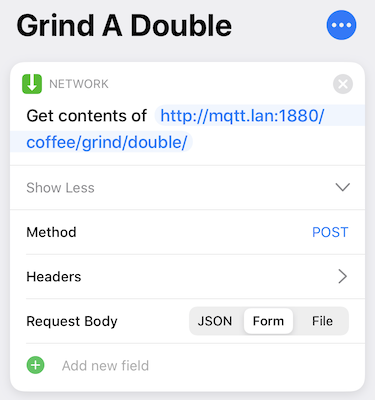
Shortcut

And the other one is just as simple.


Now, I’m off to make another coffee.

Hey Siri, Grind A Double!
Models from JSON(B)

One of the things we’ll often try to do is reduce the number of database queries. In Django, this is most often done by using the select_related queryset method, which does a join to the related objects, thus returning the data from those, and then automatically creates the instances for those objects.

This works great if you have a foreign key relationship (for instance, you are fetching Employee objects, and you also want to fetch the Company for which they work).

Tt does not work if you are following the reverse of a foreign key, or a many-to-many relation. You can’t select_related to get all of the employee’s locations at which she can work, for instance. In order to get around this, Django also provides a prefetch_related queryset method, that will do a second query and fetch all of the related objects for all of the objects in the initial queryset. This is evaluated at the same time as the initial queryset, so works pretty well during pagination, for example.

But, we don’t always want all of the objects: sometimes we might only want the most recent related object. Perhaps we have a queryset of Employee objects, and we want their most recent EmploymentPeriod. If we just want one field from that object (their start date, for instance), then we can do that using a subquery:

employment_start = EmploymentPeriod.objects.filter(
    employee=OuterRef('pk'),
).order_by('-start').values('start')[:1]

employees = Employee.objects.filter(
    company=company,
).annotate(
    start_date=Subquery(employment_start)
)

We can go a little bit further, and limit to only those currently employed (that is, they have no termination date, or their termination date is in the future).

employment_start = EmploymentPeriod.objects.filter(
    employee=OuterRef('pk'),
).filter(
    models.Q(finish__isnull=True) |
    models.Q(finish__gte=datetime.date.today())
).order_by('-start').values('start')[:1]

employees = Employee.objects.filter(
    company=company,
).filter(
    # New Django 3.0 feature alert!
    Exists(employment_start)
).annotate(
    start_date=Subquery(employment_start)
)

We could rewrite this to remove the OR, perhaps by using a DateRange annotation and using an overlap: but we’d want to ensure there was an index on the table that postgres would be able to use. Alternatively, if we stored our employment period using a date range instead of a pair of date fields, but that makes some of the other queries around this a bit more complicated.

But this does not help us if we want to get the whole related object. We could try to use a Prefetch object to obtain this:

Employee.objects.filter(
    company=company,
).prefetch(models.Prefetch(
    'employment_periods',
    queryset=EmploymentPeriod.objects.order_by('-start')[:1], to_attr='current_employment_periods',
))

But this will not work: because the filtering to the employee’s own employment periods is not applied until after the slice. We could do the ordering, and then just select the first one as the current employment period, but we would then still be returning a bunch of objects when we only need at most one.

It would be excellent if we could force django to join to a subquery (because then we could use select_related), however that’s not currently possible (or likely in the short term). Instead, we can turn our EmploymentPeriod into a JSON object in tha database, and then turn that JSON object into an instance of our target model.

class ToJSONB(Subquery):
    template = '(SELECT to_jsonb("row") FROM (%(subquery)s) "row")'
    output_field = JSONField()


current_employment_period = EmploymentPeriod.objects.filter(
    employee=OuterRef('pk')
).order_by('-start')[:1]

employees = Employee.objects.filter(
    company=company
).annotate(
    current_employment_period=ToJSONB(current_employment_period)
)

This gets us part of the way, as it turns our employment period into a JSON object. Let’s try turning that JSON object into an instance:

class EmployeeQuerySet(models.query.QuerySet):
    def with_current_employment_period(self):
        current_employment_period = EmploymentPeriod.objects.filter(
            employee=OuterRef('pk')
        ).order_by('-start')[:1]

        return self.annotate(
            current_employment_period=ToJSONB(current_employment_period)
        )


class Employee(models.Model):
    # field definitions...

    objects = EmployeeQuerySet.as_manager()

    @property
    def current_employment_period(self):
        return getattr(self, '_current_employment_period', None)

    @current_employment_period.setter
    def current_employment_period(self, value):
        if value:
          self._current_employment_period = EmploymentPeriod(**value)

And now we can query and include the current employment period (as an instance), without having to have an extra query:

>>> Employee.objects.with_current_employment_period()[0].current_employment_period
<EmploymentPeriod: 2019-01-01  >

To improve this further, we could allow assigning an EmploymentPeriod object to the value (instead of just the dict), and if that is the case, we could write that value to the database, but that’s probably going to play havoc with constraints that would prevent overlaps.

Get IP Address from a known MAC Address

I’ve been playing around with networking hardware for the last week or so. I have a bunch of different types of things: several Airport Extremes, a bunch of Airport Expresses, and a smattering of other devices, including one no-brand WiFi extender.

I also have a pcDuino, which I bought when they were still very overpriced.

I was attempting to install a newer version of Debian onto that device today (specifically, Armian). I burned an image to an SD card, and put it in the slot, expecting it to pop up on my network (it should have the same IP address, because I have a fixed lease set aside for that MAC address). However, it didn’t pop up, so I starting digging for it.

The other day I had a similar issue with the no-brand WiFi adapter: it had decided it would have a static IP address (which I may have done ages ago: I’m not sure I ever really set that up though).

I tried a bunch of things to try to get it’s IP address, without success. There was no DHCP record, and I could not find it in any arp -a lists. Then, I happened across a method I had not tried before: using tcpdump:

sudo tcpdump -i en1 -s 0 -v -n ether host aa:bb:cc:dd:ee:ff

Eventually, that showed me what IP address that device was using, and I was able to connect to it by setting a compatible IP address on another device, and using that IP address directly.

Ratio Ordering in Postgres

A while ago, I had an idea about how to use a materialised view to handle ordering and pagination. Today in #postgresql on IRC, there was a discussion about using ratio ordering. Which reminded me that I also did some work on that.

It’s possible to use both of these techniques together to allow easy access to ordinal position, and more importantly, fast pagination over large data sets. We can also make use of a few other new postgres features to make things even nicer.

CREATE TABLE condition (
  condition_id INTEGER PRIMARY KEY GENERATED ALWAYS AS IDENTITY,
  name TEXT UNIQUE NOT NULL,
  position_a INTEGER NOT NULL,
  position_b INTEGER NOT NULL,
  ratio_position NUMERIC UNIQUE GENERATED ALWAYS AS (position_a::NUMERIC / position_b::NUMERIC) STORED
);

We can add some data to make sure we have correct behaviour on those generated columns:

INSERT INTO condition (name, position_a, position_b)
VALUES ('One', 1, 1),
       ('Two', 2, 1);

We can also try adding in values that should be prevented:

-- Different position_a/position_b, but position_a / position_b clashes.
INSERT INTO condition (name, position_a, position_b)
VALUES ('Three', 2, 2);

-- Not able to divide by zero.
INSERT INTO condition (name, position_a, position_b)
VALUES ('Three', 2, 0);

Okay, it would be really neat if by default we just inserted a new value at the end of the list. However, this would require us to be able to have a DEFAULT on a pair of columns. Perhaps if we were storing these as a custom type, with a custom sequence, we could do that.

Anyway, onward. We can insert values between two others by doing some simple mathematics:

INSERT INTO condition (name, position_a, position_b)
VALUES (
  'One-point-five',
  1 + 2,  -- The sum of the previous and next items' position_a values
  1 + 1   -- The sum of the previous and next items' position_b values
);

And, we can see that we now have the sortable by the correct field:

SELECT name FROM condition ORDER BY ratio_position;
name
One
One-point-five
Two

(3 rows)

So, what about getting the ordinal positions? We can do that using a row_number() window function, but that’s only useful if we are fetching all of them.

We can re-use the trick of creating a materialised view that contains all of them:

CREATE MATERIALIZED VIEW condition_position AS

SELECT condition_id,
       row_number() OVER () AS position
  FROM condition
  ORDER BY ratio_position;

CREATE UNIQUE INDEX condition_position_condition ON condition_position(condition_id);
CREATE UNIQUE INDEX condition_position_position ON condition_position(position);

And now we can use it:

SELECT *
  FROM condition
 INNER JOIN condition_position USING (condition_id)
 ORDER BY position;

We want this to recalculate whenever any positions change:

CREATE OR REPLACE FUNCTION refresh_positions()
RETURNS TRIGGER AS $$
BEGIN
  EXECUTE 'REFRESH MATERIALIZED VIEW ' || TG_ARGV[0];
  RETURN NEW;
END;
$$ LANGUAGE plpgsql STRICT;

CREATE TRIGGER condition_refresh_positions
AFTER INSERT OR UPDATE OR DELETE OR TRUNCATE
ON condition
FOR EACH STATEMENT
EXECUTE PROCEDURE refresh_positions('condition_position');

Now we can add more data:

INSERT INTO condition (name, position_a, position_b)
VALUES ('Three', 5, 1);

And fetch our data again:

SELECT *
  FROM condition
 INNER JOIN condition_position USING (condition_id)
 ORDER BY position;
condition_id name position_a position_b ratio_position position
1 One 1 1 1.00000000000000000000 1
2 Two 2 1 2.0000000000000000 2
5 One-point-five 3 2 1.5000000000000000 3
8 Three 5 1 5.0000000000000000 4

(4 rows)

Hacking the DETA rewireable plug

There are a bunch of inexpensive IoT devices coming onto the market. One of these ranges are the GridConnect devices available from Bunnings. I’ve been eyeing these off, because they include some fairly reasonable looking switches and plugs, and, most importantly, are legal to have installed in your home in Australia.

I’m not okay with sticking a bunch of devices into my home network that communicate with the outside world. I like to use Apple’s HomeKit, which means the communication is funnelled through their systems, and everything I have configured as a HomeKit accessory either has no cloud component, and is where possible isolated onto a seperate wireless network.

In fact, most of my devices are home built, and have limited accesibility: they are permitted to connect to an MQTT server and nothing else.

Most of the commercially available items in Australia fail this test: they all have their own little cloud service. I dislike this for a couple of reasons: the first is security and privacy. I don’t trust that these providers will protect my data.

The second is a little more subtle: if an IoT provider goes out of business (or decides to end-of-life some products), then you are no longer able to access them in the way you might have liked.

So, I’ve been creating my own devices, or re-purposing commercial devices where possible. I grabbed a couple of the Mirabella globes, and was able to flash them with an ESPHome firmware, that I believe hardens the device somewhat. Having controllable light globes is neat, but realistically, they are of limited use. Having to use an App to turn on and off your lights is unacceptable, but also so is having an always listening microphone. And, again, what happens when you want to turn your lights on and your internet is down?

So, I’m more interested in smart switches.

I was not able to find much information about the Deta line of products that support GridConnect, so I went and bought the cheapest one, that I thought I was going to be realistically able to reverse engineer.

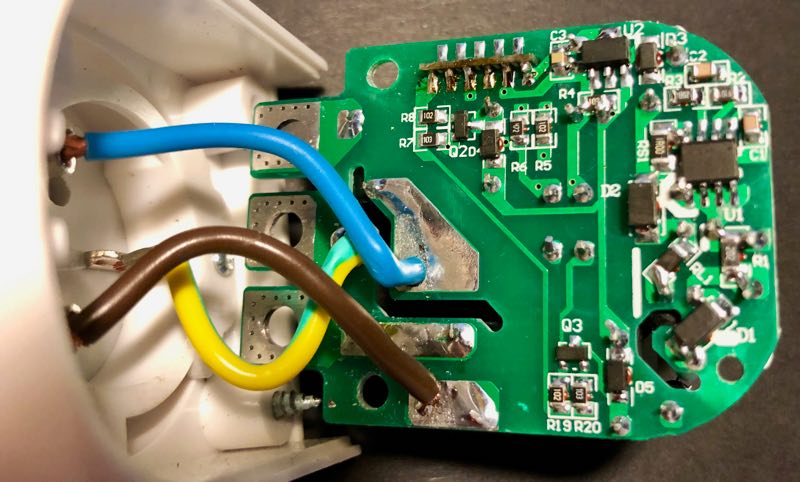
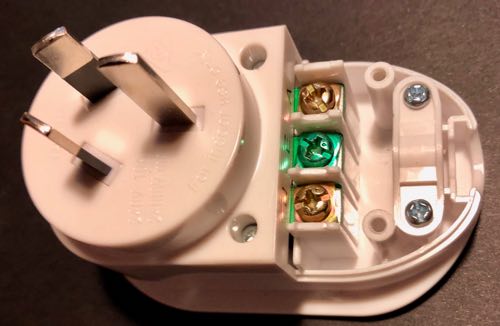
Opening up the “user accessible” region, we see the three screws for attaching the cable, and some lovely 2.0mm triangular screws.

IMG 2119

After spending more money on a set of screwdriver bits that had this size and shape, we are able to see the top of the PCB.

IMG 2120

Note that there are two relays: this is safer than things like the Sonoff Basic, that only switch the active wire, rather than both.

The underneath shows clearly the separation between the different AC lines.

IMG 2121

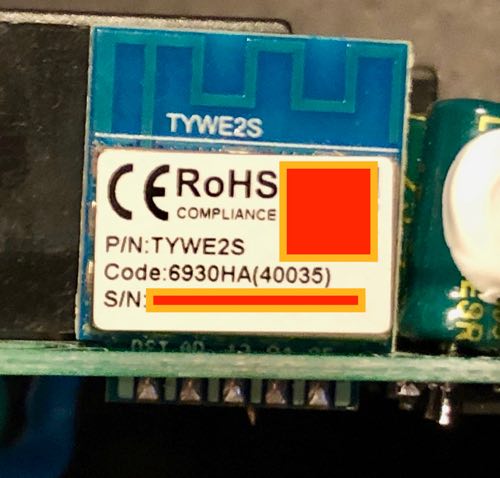
Finally, we can see the brains behind this switch:

IMG 2122

Note the code on the microcontroller: TYWE2S. Plugging that into a search engine yielded some interesting results.

It turns out that not only are these using an ESP8285 (which is just an ESP8266 with onboard flash, and in a smaller package), but they are running the Tuya firmware. So, it wasn’t even necessary to have opened up the casing.

Since I had a Raspberry Pi Zero W configured to run tuya-convert, I built up a simple firmware that would enable me to run OTA updates after flashing, and settled down to working out which GPIO pins are attached to which parts: the button, LED and relay.

(Oh, and this was interesting: both the active and neutral lines are toggled by relays, as opposed to something like the Sonoff, that only toggles the active line).

At some point, possibly because I was tired, I flashed a firmware that accessed GPIO pins 6 and 7. This locks the device up, and prevents booting. So, I then soldered some wires onto the device (after opening it back up again: so it turned out I did need that fancy screwdriver bit) to get access to the UART.

Interestingly, the ESPHome firmware detects that it’s been unable to boot, and boots into a safe mode. So, again, in hindsight, I still didn’t need to open it up.

Through trial and error, I was able to determine which GPIO was the button. That’s the easiest (and was helpful for me to be able to determine the LED and relay).

Surprisingly, it was GPIO1. Those familiar with the ESP8266 may know this is normally the TX pin for the UART. Which explains why, when I had the serial port connected, I was seeing a bunch of weird things when I pushed the button.

Once I had that, it was a matter of trying each GPIO in turn to see which was the relay and which was the LED. I did them in pairs, and happened to choose GPIO13 and GPIO14 in the same test, so for a while I thought maybe the relay and the LED were hardwired together.

Anyway, I now have a working firmware for this device:

substitutions:
  device_name: deta_plug

wifi:
  # Hah!

esphome:
  name: $device_name
  platform: ESP8266
  board: esp01_1m

binary_sensor:
  - platform: status
    name: "Status"

  - platform: gpio
    pin:
      number: GPIO1
      inverted: true
      mode: INPUT_PULLUP
    name: GPIO1
    on_press:
      - switch.toggle: relay

switch:
  - platform: gpio
    id: led
    pin:
      number: GPIO13
      inverted: true
  - platform: gpio
    id: relay
    pin: GPIO14
    on_turn_on:
      - switch.turn_on: led
      - mqtt.publish:
          topic: HomeKit/${device_name}/Switch/On
          retain: ON
          payload: 1
    on_turn_off:
      - switch.turn_off: led
      - mqtt.publish:
         topic: HomeKit/${device_name}/Switch/On
         retain: ON
         payload: 0


sensor:
  - platform: wifi_signal
    name: "WiFi signal sensor"
    update_interval: 60s

ota:

logger:

mqtt:
  broker: "mqtt.lan"
  discovery: false
  topic_prefix: esphome/${device_name}
  on_message:
    - topic: HomeKit/${device_name}/Switch/On
      payload: "1"
      then:
        - switch.turn_on:
            id: relay
    - topic: HomeKit/${device_name}/Switch/On
      payload: "0"
      then:
        - switch.turn_off:
            id: relay

I’m using my MQTT ⟺ HomeKit bridge, since that works great, but you could easily change the MQTT topics, or do whatever else you want to do.

Update: turns out, I just needed to search for the code: this page has everything I would have needed.

Sonoff Basic unable to connect to Wifi on AC power

I have a few of the Sonoff Basic devices. I’d flashed one of them with a custom firmware before, but then was using the stock firmware, and having them operate in LAN mode.

However, that’s less than awesome: for one, it means I need to have (and maintain) a custom service running somewhere on my network, and because of the way you need to provision them, it’s hard to move this to a different machine.

With ESPhome, I’ve started re-flashing my old ESP8266 devices, so I had a go at some of the Sonoff. Neither of the ones I had installed (with the stock firwmare) had headers soldered onto the UART pins, but it turned out that one of my USB-UART devices had the pins in the correct order that I was able to (after disconnecting it from the mains, of course), hold the button down, press the USB-UART device into position, and then connect the USB port. After a couple of seconds, I released the button, and, eventually (after a couple of tries), have the device in “flash” mode.

Of course, I only discovered this after totally disconnecting one, soldering on some header pins and then connecting the device using hookup wires.

Then I uploaded the custom firmware. At which point I was able to re-upload firmware using the OTA mode, which means I no longer had to juggle the serial connector, USB and GPIO0 button.

So, I then flashed another one, this time without having to solder, and had both of them configured as devices on my IoT network.

But, there was a problem. They would only connect to the Wifi when they were connected to the serial connector. When I disconnected the serial port, and reconnected them to the mains supply, they would operate correctly, but would not connect to Wifi. Even though one of them was literally less than a metre from the router.

I did a bit of research, and there apparently are a batch that are like this. Tasmota firmware has issues that mention this on GitHub, but then in those issues they are marked as “resolved”. Unfortunately there was not really a good resolution - more than likely it was just some type of stale-bot just closing issues that had not been updated in a certain time frame. At least one of these suggested that a newer firmware worked, but that was no good for me.

A couple of these issues identified that there was a missing capacitor, but one of them mentioned that they had soldered together the 3v3 supply, and the RX and TX pins.

So, I ran some experiments. Connecting the 3v3 pin to either of those other pins had no effect, but connecting the RX and TX together suddenly allowed my device with the header pins to connect!

Luckily, these pins are adjacent, so I found a jumper (I remember when these were on just about every hard drive, but I couldn’t find one today with a single pin), and hooked it up.

All good!

Unfortunately, when putting it back together I didn’t align the top cover with the button correctly, so I managed to break that. Which just means I can’t control the switch directly, only remotely. That’s pretty annoying (it’s one of the reasons I went with Sonoff over some other solutions), but at least it works on HomeKit now.

Random, Fixed Ordering and Pagination

Consider the following situation:

We have a set of items that we want to show in a random order. The order, however, should remain fixed for a period. The display of items will need to be paginated, and we have over 200,000 items.

If the ordering is not truly random, then we could have an expression index, and allow ordering based on that. However, that doesn’t really help out with the pagination, and issues around LIMIT/OFFSET ordering of very large sets.

Instead, I came up with a solution this afternoon that uses Postgres Materialised Views.

Let’s start with a Django model:

class Post(models.Model):
    title = models.TextField()
    content = models.TextField()
    posted_at = models.DateTimeField()

We can build up a materialised view that associates each post with a position:

CREATE MATERIALISED VIEW post_ordering AS

SELECT post.id AS post_id,
       row_number() OVER () AS position
  FROM (
    SELECT id FROM blog_post ORDER BY random()
  ) post;

CREATE INDEX post_ordering_id ON post_ordering(post_id);
CREATE INDEX post_ordering_position ON post_ordering(position);

Because a materialised view stores a copy of the data, we need to index it if we want to get performance benefits.

This materialised view is interesting from the pagination perspective because there are no gaps in the position values, even if there are missing post_id values. This means we can use filtering to paginate, instead of having to use the regular slicing notation.

Do note that the ordering needs to be done inside a subquery, otherwise it will not work correctly.

We do need to stick a model in front of this to access it from Django:

class PostPosition(models.Model):
    post = models.OneToOneField(
        primary_key=True,
        related_name='ordering',
        on_delete=models.DO_NOTHING,
    )
    position = models.IntegerField()

    class Meta:
        managed = False
        db_table = 'post_ordering'

Now, because we have a relationship defined, we may filter using this:

page_2 = Post.objects.filter(
    ordering__position__gte=100,
    ordering__position__lt=200
).order_by('ordering__position')

From here, we just need to create a custom paginator to use this instead of the normal slicing.

class PositionPaginator(django.core.paginators.Paginator):
    def page(self, number):
        number = self.validate_number(number)
        bottom = (number - 1) * self.per_page
        top = bottom + self.per_page
        if top + self.orphans >= self.count:
            top = self.count
        return self._get_page(self.object_list.filter(
            ordering__position__gte=bottom,
            ordering__position__lt=top
        ).order_by('ordering__position'), self)

The last piece of the puzzle is getting the refresh of the ordering. In postgres, you just need:

REFRESH MATERIALISED VIEW post_ordering;

EspHome and HomeKit

HomeKit is Apple’s home automation software, and it’s pretty nice. It is local by default, although it can be configured to allow access from outside your home network, it does so in a way that does not store all of your data on an external server. Instead, the hub (an AppleTV, iPad or HomePod that lives in your house) can be contacted by your iOS or macOS device, and interact that way.

I’ve been playing around with the ESP8266 microcontroller, and whilst you could put a complete HomeKit Automation Protocol client on there, it’s probably going to run too slow to be useful. Instead, I’ve written an MQTT to HomeKit bridge, and just have simple devices that send data to the local MQTT broker.

I’ve even set up a different wireless network, just for those devices. They cannot connect to the outside internet, only to the MQTT broker (which is then in turn able to connect to the HomeKit hub). That can comfortably run on a Raspberry Pi Zero W.

The story for writing custom firmware for the IoT devices is a bit more complex. I started out with MicroPython, and then (after running into problems with devices stopping and requiring a reset), moved to an Arduino approach. Following that (and after meeting the author of MicroPython), I went back to that. But, as I thought more about it, there were a bunch of features that I wanted to implement, and my deployment processes were somewhat awkward.

I’d looked at the various packaged firmware: Espurna, and Tasmota in particular. All of these have a bunch of people using them (which is good, because then I don’t have to reimplement everything). But all of them were not quite able to do what I wanted, which was just send messages to a specific MQTT topic (and perhaps listen on that one too).

Then I came across ESPHome. This enables you to use YAML to define a device and it’s services, and is far more flexible than the prepackaged firmware. You can run the build tool in docker, which compartmentalises it and means you don’t have to worry about maintaining an installation of the tool. And, it can do OTA updates, as well as provide access to logs over Wifi!

So, now, I can have a really nice workflow for building and deploying firmware.

esphome:
  name: temperature_01
  platform: ESP8266
  board: nodemcuv2

wifi:
  ssid: "SSID"
  password: "PASSWORD"

# Enable logging
logger:

ota:

i2c:
  - id: bus_a
    sda: D2
    scl: D1
    scan: True

sensor:
  - platform: bmp280
    i2c_id: bus_a
    address: 0x76
    temperature:
      name: "Temperature 1"
      state_topic: HomeKit/temperature_01/TemperatureSensor/CurrentTemperature
    pressure:
      name: "Inverter pressure 1"
  - platform: wifi_signal
    name: "WiFi signal sensor"
    update_interval: 60s

mqtt:
  broker: "mqtt.lan"
  discovery: false
  topic_prefix: esphome/temperature_01

In addition to this, I came across the tuya-convert package, and Mirabella Wifi Bulbs, which are $15 at K-mart, so now I have a couple of those. Although, I am still not happy with not being able to have the smarts at the switch, but since I don’t have neutral wires in the switch, that’s a problem.

Functions as Tables in Django and Postgres

Postgres has some excellent features. One of these is set-returning functions. It’s possible to have a function (written in SQL, or some other language) that returns a set of values. For instance, the in-built function generate_series() returns a set of values:

SELECT day::DATE
  FROM generate_series(now(),
                       now() + INTERVAL '1 month',
                       '1 day') day;

This uses a set returning function as a table source: in this case a single column table.

You can use scalar set-returning functions from within Django relatively easily: I blogged about it last year.

It is possible to create your own set-returning functions. Further, the return type can be a SETOF any table type in your database, or even a “new” table.

CREATE OR REPLACE FUNCTION foo(INTEGER, INTEGER)
RETURNS TABLE(id INTEGER,
              bar_id INTEGER,
              baz JSON[]) AS $$

  SELECT foo.id AS id,
         bar.id AS bar_id,
         ARRAY_AGG(JSON_BUILD_OBJECT(bar.x, foo.y))
    FROM foo
   INNER JOIN bar ON (foo.id = bar.foo_id)
   WHERE foo.y = $1
     AND bar.x > $2
   GROUP BY foo.id, bar.id

$$ LANGUAGE SQL STABLE;

It’s possible to have a Postgres VIEW as the data source for a Django model (you just set the Meta.db_table on the model, and mark it as Meta.managed = False). Using a FUNCTION is a bit trickier.

You can use the QuerySet.raw() method, something like:

qs = Foo.objects.raw('SELECT * FROM foo(%s, %s)', [x, y])

The downside of using raw is you can’t apply annotations, or use .filter() to limit the results.

What would be useful is if you could extract the relevant parameters out of a QuerySet, and inject them as the arguments to the function call.


But why would we want to have one of these set (or table) returning functions? Why not write a view?

I have some complex queries that reference a whole bunch of different tables. In order to be able to write a sane query, I decided to use a CTE. This allows me to write the query in a more structured manner:

WITH foo AS (
  SELECT ...
    FROM foo_bar
   WHERE ...
),
bar AS (
  SELECT ...
    FROM foo
   WHERE ...
   GROUP BY ...
)
SELECT ...
  FROM bar
 WHERE ...

There is a drawback to this approach, specifically how it interacts with Django. We can turn a query like this into a view, but any filtering we want to do using the ORM will only apply after the view has executed. Normally, this is not a problem, because Postgres can “push down” the filters it finds in the query, down into the view.

But older versions of postgres are unable to perform this operation on a CTE. In other words, each clause of a CTE must run (and be fully evaluated at that point in time) before the next one can run. In practice, if a clause of a CTE is not referenced later on, postgres will not execute that clause, but that is the extent of the optimisation.

So, if we had 50 million objects in foo_bar, and we needed to filter them in a dynamic way (ie, from the ORM), we would be unable to do this. The initial clause would execute for all 50 million rows, and then any subsequent clauses would then include all these, and so on. Then, the filtering would happen after the view had returned all it’s rows.

The workaround, using a function, is to use the parameters to do the filtering as early as possible:

CREATE OR REPLACE FUNCTION foo(INTEGER, INTEGER, INTEGER)
RETURNS TABLE(...) AS $$

  WITH foo_1 AS (
    SELECT *
      FROM foo_bar
     WHERE x BETWEEN $1 AND $2
  ),
  bar AS (
    SELECT *
      FROM foo_1
     INNER JOIN baz USING (baz_id)
     WHERE baz.qux > $3
  )

  SELECT ...
    FROM bar
   GROUP BY ...

$$ LANGUAGE SQL STRICT IMMUTABLE;

Notice that we do the filtering on foo_bar as early as we possibly can, and likewise filter the baz the first time we reference it.

Now we have established why we may want to use a function as a model source, how do we go about doing that?


We are going to dig fairly deep into the internals of Django’s ORM now, so tighten up your boots!

When Django comes across a .filter() call, it looks at the arguments, and applies them to a new copy of the QuerySet’s query object: or more specifically, the query.where node. This has a list of children, which Django will turn into SQL and execute later. The QuerySet does some validation at this point: we will only use those fields known to the QuerySet (either through being fields of the Model, or those that added using .annotate()). Any others will result in an exception.

This will require some extension, as it is possible that one or more arguments to a Postgres function may not be fields on the Model class used to define the shape of the results.

Each Node within a QuerySet’s query has a method: .as_sql(). This is the part that turns the python objects into actual SQL code. We are going to leverage the fact that even the python object that refers to the table itself uses .as_sql() to safely allow passing parameters to the function-as-a-table.

Normally, the .as_sql() method of the BaseTable object returns just the name of the table (possibly with the current alias attached), and an empty list as params. We can swap this class out with one that will return an SQL fragment, containing function_name(%s, %s) (with the correct number of %s arguments), and a list containing those parameters.

Every Postgres function has a unique signature: the function name, and the list of parameters; or more specifically, their types. Thus, postgres will deem the functions:

  • foo(INTEGER, INTEGER)
  • foo(INTEGER, INTEGER, BOOLEAN)

as distinct entities. We will ignore for now the fact it is possible to have optional arguments, variadic arguments and polymorphic functions.

We need some way of storing what the signature of a Postgres function is. Initially, I used an analog (perhaps even just a subclass) of Django’s Model class. This enabled me to create (temporary) Exact(Col()) nodes to go in the query.where.children list, to be later removed and used for function arguments. I needed to ignore the primary key field, and it always felt wrong to add to the WhereNode, only to remove later.

I ended up settling on a class like Django’s Form class. It uses a metaclass (but requires a Meta.function_name), and uses Django’s form fields to define the arguments.

class FooFunction(Function):
    x = forms.IntegerField()
    y = forms.IntegerField()
    z = forms.BooleanField(required=False, default=True)

    class Meta:
        function_name = 'foo'

A Function subclass can generate a Manager on a Model class, but also can also create the object that will in turn create the relevant SQL. That part happens automatically, when a queryset created from the manager is filtered using appropriate arguments. The Function subclass uses it’s fields to validate the params that it will be passing are valid for their types. It’s a bit like the clean() method on a Form.

We then also need a model class (it could be a model you have already defined, if your function returns a SETOF <table-name>):

class Foo(models.Model):
    bar = models.ForeignKey('foo.Bar', related_name='+', on_delete=models.DO_NOTHING)
    baz = JSONField()

    objects = FooFunction.as_manager()

    class Meta:
        db_table = 'foo()'
        managed = False

Because this is a new and unmanaged model, then we need to set the on_delete so that the ORM won’t try to cascade deletes, but also mark the model as unmanaged. I also set the Meta.db_table to the function call without arguments, so it looks nicer in repr(queryset). It would be nice to be able to get the actual arguments in there, but I haven’t managed that yet.

If this was just a different way of fetching an existing model, you’d just need to add a new manager on to that model. Keep in mind that Django needs a primary key field, so ensure your function provides one.

Then, we can perform a query:

>>> print(Foo.objects.filter(x=1, y=2).query)
SELECT foo.id, foo.bar_id, foo.baz FROM foo(1, 2)
>>> print(Foo.objects.filter(x=1, y=2, z=True).query)
SELECT foo.id, foo.bar_id, foo.baz FROM foo(1, 2, true)
>>> print(Foo.objects.filter(x=1, y=2, bar__gt=5).query)
SELECT foo.id, foo.bar_id, foo.baz FROM foo(1, 2) WHERE foo.bar_id > 5
>>> print(Foo.objects.filter(x=1, y=2).annotate(qux=models.F('bar__name')).query)
SELECT foo.id, foo.bar_id, foo.baz, bar.name AS qux
FROM foo(1, 2) INNER JOIN bar ON (bar.id = foo.bar_id)

Note that filters that are not function parameters will apply after the function call. You can annotate on, and it will automatically create a join through a foreign key. If you omit a required parameter, then you’ll get an exception.

So, where’s the code for this?

Well, I need to clean it up a bit, and write up some automated tests on it. Expect it soon.

Orders please!

Things are better when they are ordered.

Why might we want things ordered?

From a user experience perspective, if things are not ordered the same way upon repeated viewings, they are liable to get confused, and think that things have changed, when really it’s only the order that has changed.

Some time ago, there were versions of Microsoft Office that used to move menu items closer to the start of the menu that had been used more recently and more frequently. This is not “most recent documents”, or onything like that: this was the menu items like “Format” and other tools. There’s a pretty good rationalé for why they stopped doing that!

Why might we need things ordered?

There are a few reasons why we must have things ordered. One good example is the reason Django will complain about a queryset without ordering when you use pagination: if you select the first 10 items when there is no ordering, and then select the next 10 items, there is no guarantee that those items will not have some of the same items as the first set. Without ordering, pagination is useless. There’s no way to page through items and ensure that you see all of them.

Another reason is where you need to process things in a specific order: either to ensure that the first (or last) matching item is “the winner”. We’ll come across one of those shortly.

Ordering by a specific value or set of values (or function over the same) is usually a sane way to order. This could be alphabetically, by date of insertion, or some numeric value, for instance.

How should we order things?

Sometimes, it is obvious how we should order a list of things. Sometimes the order doesn’t matter, and sometimes we want to allow an ordering that doesn’t rely at all on any attributes of the objects in question.

Let’s look at a list of condition names that might be used for a workplace agreement in Australia.

  • Regular Hours
  • Public Holiday
  • Saturday
  • Sunday
  • After 6pm
  • Regular Overtime (first 2 hours)
  • Extended Overtime (more than 2 hours)

For those outside of Australia: under many work circumstances, employees will get paid at a higher rate because of what are called “Penalty” conditions. This could include being paid, for example, a 15% loading on a Saturday, and a 25% loading on a Sunday. We can rewrite this list with the loading percentages:

Condition Penalty Rule
Regular Hours 100 % When no other rules apply
Public Holiday 200 % Any hours on a public holiday
Saturday 125 % Any hours on a Saturday
Sunday 150 % Any hours on a Sunday
After 6pm 117 % Any hours between 6pm and midnight
Regular Overtime 150 % After 8 hours worked in a day or 38 hours in a week
Extended Overtime 200 % After 2 hours of overtime worked, or any overtime on a Sunday

So now we have two possible ways of ordering our list, by name:

  • After 6pm
  • Extended Overtime (more than 2 hours)
  • Public Holiday
  • Regular Hours
  • Regular Overtime (first 2 hours)
  • Saturday
  • Sunday

Or by penalty rate:

  • 100% Regular Hours
  • 117% After 6pm
  • 125% Saturday
  • 150% Regular Overtime (first 2 hours)
  • 150% Sunday
  • 200% Extended Overtime (more than 2 hours)
  • 200% Public Holiday

However, there’s actually a little more complexity than this. We can have the rules in this order, and apply them sequentially, and we should get the right result for an employee’s wages. But, according to our rules, we should be applying Extended Overtime for any overtime hours on a Sunday. So we need some way of controlling the ordering manually.

Specifically, we want to have our conditions ordered in a way that we can check each rule in turn, and ensure that the last rule that is applied will be the one that should apply, if multiple rules do match.

  • Regular hours
  • After 6pm
  • Saturday
  • Sunday
  • Regular Overtime
  • Extended Overtime
  • Public Holiday

So, how do we actually store this custom ordering?

The naive solution is to store an integer for each item, and ensure that we only have one of each value. Let’s look at that as a Django model:

class Condition(models.Model):
    name = models.TextField()
    penalty = models.DecimalField()
    position = models.IntegerField(unique=True)

Then, we can ensure we get our conditions in the correct order by applying an ordering to our queryset:

queryset = Condition.objects.order_by('position')

However, this solution is not without it’s drawbacks. Primarily, to insert an object between two others, we renumber all of the subsequent items:

condition = Condition(name='New condition', position=3, penalty=Decimal('1.20'))
Condition.objects.filter(position__gte=condition.position).update(position=F('position') + 1)
condition.save()

We must ensure that within our database, we are able to suspend constraints until our transaction is complete, or we must perform actions in a specific order. If we care about not having “holes” between our positions, then we also need to renumber remaining objects when we remove one.

Let’s have a look at how we could handle this, with some client and server code. We can use a formset here, which has ordering permitted, and then we just need the JS to make that happen:

ConditionPositionFormSet = modelformset_factory(Condition, ordering=True, fields=())

class OrderConditionsView(FormView):
    form_class = ConditionPositionFormSet

This will result in rewriting all items one by one, which must happen in a transaction, or in the correct order.


Alternatively, we could use a form that just indicates the new position of a given condition, and have that form handle the UPDATE queries: this will result in just two queries instead.

class ConditionPositionForm(forms.ModelForm):
    class Meta:
        model = Condition
        fields = ('position',)


class OrderConditionsView(UpdateView):
    """
    Handle an AJAX request to move one condition to a new position.

    The condition in that position will be moved to the next position, and so on.
    """
    form_class = ConditionPositionForm

    def form_valid(self, form):
        position = form.cleaned_data('position')
        self.get_queryset.filter(position__gte=position)\
                         .exclude(pk=form.instance.pk)\
                         .update(position=F('position') + 1)
        form.save()
        return HttpResponse(json.dumps({'status': 'ok'}))

    def form_invalid(self, form):
      return HttpResponse(json.dumps({
        'status': 'error',
        'message': form.fields['position'].errors,
      }), status_code=409)

    def get_queryset(self):
        return Condition.objects.order_by('position')

# urls.py: simplified

urlpatterns = [
  include('/condition/', [
    path('/condition/<int:pk>/position/', OrderConditionsView.as_view(), name='position'),
    # ...
  ], namespace='condition'),
  # ...
]

In this case, our HTML and JS can just send back the one that was moved, and it’s new position. We’ll want some mechanism for indicating that the move was successful though, because it may not be permitted to move some objects to specific positions.

  <ul id="conditions">
    {% for condition in object_list %}
      <li data-position-url="{% url 'condition:position' condition.pk %}">
        {{ condition.name }} ({{ condition.penalty }}%)
      </li>
    {% endfor %}
  </ul>

  <script>
  // Uses SortableJS: https://github.com/SortableJS/Sortable

  require(['Sortable'], (Sortable) => {
    function save(evt) {
      const condition = evt.item;

      function revert() {
        if (evt.oldIndex < evt.newIndex) {
          // Move back to the old index.
          condition.before(condition.parentElement.children[evt.oldIndex]);
        } else {
          // The old index is actually in the wrong spot now,
          // move back to the old index + 1
          condition.before(condition.parentElement.children[evt.oldIndex + 1]);
        }
      }

      fetch(condition.dataset.positionUrl, {
        method: 'POST',
        body: {position: evt.newIndex},
        credentials: 'same-origin'
      }).then(
        response => response.json()
      ).then(
        response => {
          if (response.status === 'error') {
            // We got an error: let's put the object back into the previous
            // position and then show that error.
            revert();
            // Maybe a nicer way than this though!
            alert(response.message);
          }
        }
      );
    }

    new Sortable(document.getElementById('conditions'), {onUpdate: evt => save});

  });
  </script>

So, are there any other ways we could store the positions of our conditions, which would allow us to insert a new one, or move one around, without having to renumber a bunch of other items?

Why yes, yes we can.

Instead of storing each position as an integer, we can instead store two numbers, and use the ratio of these two numbers as our ordering:

POSITION = ExpressionWrapper(
  models.F('position_a') / models.F('position_b'),
  output_field=models.DecimalField()
)


class PositionQuerySet(models.query.QuerySet):
    def with_position(self):
        return self.annotate(position=POSITION)

    def order_by_position(self):
        return self.order_by(POSITION)


class Condition(models.Model):
    name = models.TextField()
    penalty = models.DecimalField()
    position_a = models.IntegerField()
    position_b = models.IntegerField()

    class Meta:
      unique_together = (
        ('position_a', 'position_b'),  # In fact, this is not quite strict enough, more below.
      )

The logic behind this is that here is always the ability to find a fraction that is between two other fractions. Our initial “first” item can be given the values (1, 1), which will evaluate to 1.0

To place another item, we have three cases:

  • The new value is before the first item in the list.
  • The new value is between two existing items.
  • The new value is after the last item in the list.

Let’s look at how we can calculate the position for the newly added item:

  • Before the first item in the list:

    Increment the denominator (position_b), and use the same numerator (position_a).

    For instance, adding a new first value where our current first value is (1, 1) would give us (1, 2), which evaluates to 0.5, less than 1.0

  • After the last item in the list:

    Increment the numerator (position_a), and use the same denominator (position_b).

    For instance, adding a new value where the last value is (5, 1) would give us (6, 1), which evaluates to 6.0, greater than 5.0

  • Inserting an item between two existing items.

    Use the sum of the two numerators (position_a) as the numerator, and the sum of the two denominators (position_b) as the new denominator. Optionally, you can then simplify this fraction if there are common factors.

    For instance, if we have two values (1, 4) and (5, 1), we can make a new value (6, 5), which evaluates to 1.2, which is between 0.25 and 5.0.

The same operations can be performed on a move: we don’t actually care what the values are, just that the relative values are still consistent. Whenever we move an object, we just change it’s position_a and/or position_b to whatever makes sense for the new position.

<ul id="conditions">
  {% for condition in object_list %}
    <li class="condition"
        data-position-url="{% url 'condition:position' condition.pk %}"
        data-position-a="{{ condition.position_a }}"
        data-position-b="{{ condition.position_b}}">
      {{ condition.name }}
    </li>
  {% endfor %}
</ul>

<script>
  require(['sortable'], (Sortable) => {
    function save(evt) {
      const item = evt.item;
      const prev = condition.previousElementSibling;
      const next = condition.nextElementSibling;

      if (prev == null && next == null) {
        // This is the only item in the list.
        item.dataset.position_a = 1;
        item.dataset.position_b = 1;
      } else if (prev == null) {
        // This is now the first item in the list.
        item.dataset.position_a = next.dataset.position_a;
        item.dataset.position_b = Number(next.dataset.position_b) + 1;
      } else if (next == null) {
        // This is now the last item in the list.
        item.dataset.position_a = Number(prev.dataset.position_a) + 1;
        item.dataset.position_b = prev.dataset.position_b;
      } else {
        // Neither the first nor the last.
        item.dataset.position_a = Number(prev.dataset.position_a) + Number(next.dataset.position_a);
        item.dataset.position_b = Number(prev.dataset.position_b) + Number(next.dataset.position_b);
      }

      function revert() {
        if (evt.oldIndex < evt.newIndex) {
          // Move back to the old index.
          condition.before(condition.parentElement.children[evt.oldIndex]);
        } else {
          // The old index is actually in the wrong spot now,
          // move back to the old index + 1
          condition.before(condition.parentElement.children[evt.oldIndex + 1]);
        }
      }

      // This could do with some error handling...
      fetch(condition.dataset.positionUrl, {
        method: 'POST',
        body: {
          position_a: item.dataset.position_a,
          position_b: item.dataset.position_b
        },
        credentials: 'same-origin'
      }).then(response => response.json()).then(
        response => {
          if (response.status == 'error') {
            revert();
          }
        }
      );
    }


  })
</script>